Overview
Use Upload HTTPS Cert to replace the certificate and private key used by HTTPS web access.
The same workflow is available from the CLI through:
config system cert
Typical Uses
Use this topic when the appliance HTTPS certificate is expired, near expiration, issued for the wrong hostname, signed by the wrong CA, or needs to be replaced as part of certificate rotation.
Typical CLI examples:
Show CLI parameters: config system cert ?
Upload unencrypted key: config system cert cert_file ~/webserver.pem key_file ~/webserver.key key_file_encrypted false
Upload encrypted key:   config system cert cert_file ~/webserver.pem key_file ~/webserver.key key_file_encrypted true key_password "key-password"
Prerequisites
- Confirm that the certificate file contains PEM certificate data with
BEGIN CERTIFICATE. - Confirm that the private key file matches the certificate.
- Confirm that the private key file contains PEM private key data.
- If the private key is encrypted, collect the key password before starting the workflow.
- Keep SSH or console access available in case HTTPS access does not recover.
- Keep a backup copy of the current certificate and key when changing a production appliance.
- Confirm that the certificate and key files are each no larger than 1 MB.
- For CLI use, copy the certificate and key files to the appliance first. The CLI paths refer to files on the appliance, not files on the operator's workstation.
Workflow
- Open System Settings.
- Under Device IP and Access Services, choose Upload HTTPS Cert.
- Select HTTPS Certificate (*.crt or pem).
- Select Certificate Private Key(*.key).
- Set Key file is protected by a password according to the key file.
- If the key is encrypted, enter Password to Key File.
- Click Upload and Apply.
- Verify HTTPS web access from a new browser session.
Expected Behavior
When the workflow runs, 01Layer reads the uploaded certificate and key, validates the pair, installs them as the active web certificate files, and reloads the web service configuration.
The workflow should fail without replacing the active certificate when:
- The certificate file does not contain
BEGIN CERTIFICATE. - The private key file does not contain a private key.
- The private key is encrypted and no valid password is provided.
- The certificate and private key do not match.
- The web service cannot be reloaded with the new certificate.
If service reload fails after the files are written, the backend attempts to roll back to the previous certificate pair.
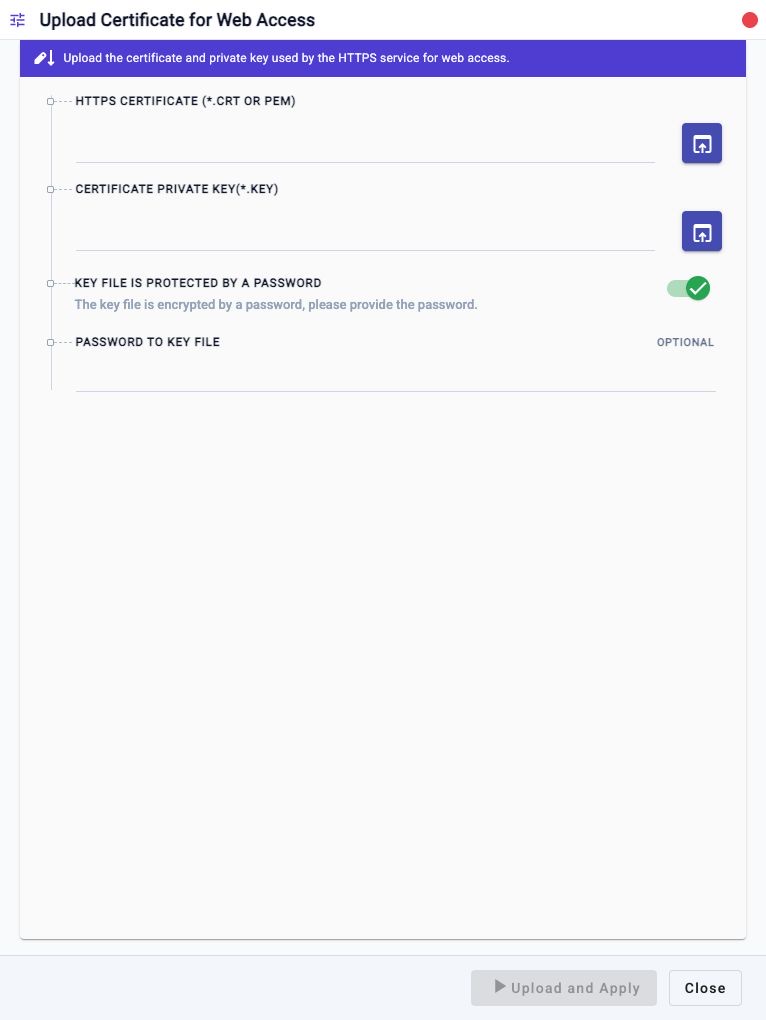
In The Web UI
- Open System Settings.
- Under Device IP and Access Services, choose Upload HTTPS Cert.
- In HTTPS Certificate (*.crt or pem), select the certificate file.
- In Certificate Private Key(*.key), select the matching private key file.
- If the private key is encrypted, keep Key file is protected by a password enabled and enter Password to Key File.
- If the private key is not encrypted, disable Key file is protected by a password.
- Click Upload and Apply.
- After the workflow completes, open a new browser session to the HTTPS management URL and verify that the expected certificate is presented.
The web workflow opens as Upload Certificate for Web Access. The upload controls accept the HTTPS certificate file and the matching private key file, and the password field is only needed when Key file is protected by a password is enabled.
CLI Help Commands
Use ? to display the available parameters:
config system cert ?
config system cert cert_file ?
config system cert key_file ?
config system cert key_file_encrypted ?
config system cert key_password ?
For file parameters, CLI help shows path-to-file. This means a path on the
appliance. The CLI does not upload a local workstation file by itself.
CLI Upload Procedure
Copy the certificate and key to the appliance. For example, from an operator workstation:
scp webserver.pem admin@<appliance-ip>:~/webserver.pem
scp webserver.key admin@<appliance-ip>:~/webserver.key
Upload a certificate with an unencrypted key:
config system cert cert_file ~/webserver.pem key_file ~/webserver.key key_file_encrypted false
Upload a certificate with an encrypted key:
config system cert cert_file ~/webserver.pem key_file ~/webserver.key key_file_encrypted true key_password "key-password"
After the workflow completes, reconnect to HTTPS and verify the browser reports the expected certificate subject, issuer, and validity period.
Field Reference
| CLI Field | UI Field | Required | Notes |
|---|---|---|---|
cert_file |
HTTPS Certificate (*.crt or pem) | Yes | Path to the certificate file on the appliance. The file must contain PEM certificate data. UI upload accepts .crt, .CRT, .pem, and .PEM. |
key_file |
Certificate Private Key(*.key) | Yes | Path to the private key file on the appliance. The key must match the certificate. |
key_file_encrypted |
Key file is protected by a password | No | Boolean value. Use true when the key file is encrypted; use false when it is not encrypted. |
key_password |
Password to Key File | Required for encrypted keys | Password used to decrypt the private key. Only used when key_file_encrypted is true. |
Confirmation And Rollback
This workflow applies the certificate directly when Upload and Apply is clicked. It does not use a separate reconnect-and-confirm step.
The backend keeps the previous active certificate and key while installing the new pair. If the web service reload fails, it attempts to restore the previous files. Operators should still keep SSH or console access available before changing a production HTTPS certificate.
To roll back manually, run the workflow again with the previous certificate and key files.
Save Without Confirmation
Upload HTTPS Cert does not provide a Save without confirmation option. The certificate is installed when Upload and Apply is clicked and validation succeeds.
Notes
- The installed files are used by the HTTPS web service as the appliance web certificate and private key.
- The backend validates certificate/key compatibility before completing the workflow.
- The certificate content must be PEM formatted, regardless of whether the file
extension is
.crtor.pem. - CLI file paths are resolved on the appliance. Relative CLI paths are resolved from the login user's home directory.
cert_fileandkey_filetab completion inl01shlists appliance-local files, not files from the operator workstation.- System Access Methods controls whether HTTPS is enabled and which HTTPS port is used.
Troubleshooting
Certificate File Is Rejected
Confirm the file contains PEM certificate data:
openssl x509 -in webserver.pem -noout -text
If this command fails, use the correct certificate file or convert the certificate to PEM format before uploading it.
Private Key File Is Rejected
Confirm the private key can be parsed:
openssl rsa -in webserver.key -check
If the key is encrypted, either provide the correct password in Password to Key File or remove the password from a copy of the key before uploading.
Certificate And Key Do Not Match
Use the matching private key for the certificate. If the certificate was issued from a CSR generated elsewhere, locate the private key used to create that CSR.
HTTPS Does Not Recover After Upload
Use SSH or console access and check the workflow log. Then either rerun Upload HTTPS Cert with the previous certificate pair or restore web access through the appliance recovery procedure.
Also verify that HTTPS is enabled in System Access Methods and that the browser is connecting to the configured HTTPS port.
Browser Still Shows The Old Certificate
Open a new browser session or clear the browser connection cache. Also verify that you are connecting to the appliance directly and not through a proxy or load balancer presenting a different certificate.
Related Tasks
- System Access Methods enables or disables HTTPS and changes the HTTPS management port.
- Device Management Access ACL restricts which client IP addresses or subnets can reach management services.
- Device Information updates appliance identity fields and login banner text.